Working with live streams
When working with live streams, you will want to retrieve details about them, update them or sometimes delete them. This guide walks you through how to manage your live streams.
API documentation
Choose an api.video client
The clients offered by api.video include:
Installation
To install your selected client, do the following:
go get github.com/apivideo/api.video-go-clientCreate an account
Before you can start streaming, you need to create an api.video account.
Once you are logged in to the Dashboard, select the environment of your choice (sandbox or production) and copy your API key.
Show live stream (retrieve details for watching)
You can retrieve details about any live stream by sending a request containing the live stream ID. The response will show you the current state of the live stream and provide all the details you need if you want to broadcast using a particular live stream container.
curl --request GET \
     --url https://ws.api.video/live-streams/li400mYKSgQ6xs7taUeSaEKr \
     --header 'Accept: application/json' \
     --header 'Authorization: Bearer eyJ0eXAiOiJKV1QiLCJhbGciOiJSUzI1NiJ9.eyJpYXQiOjE2NDI4MTQxNDUuMjE2Mzc2LCJuYmYiOjE2NDI4MTQxNDUuMjE2Mzc2LCJleHAiOjE2NDI4MTc3NDUuMjE2Mzc2LCJwcm9qZWN0SWQiOiJwclJ6SUpKQTdCTHNxSGpTNDVLVnBCMSJ9.GSDqqMzBxo-wOwl9IVbOnzevm8A6LSyaR5kxCWUdkEneSU0kIdoNfhwmXZBq5QWpVa-0GIT8JR59W6npNO-ayhaXmV3LA6EQpvv0mHd_dAhg3N8T96eC0ps0YIrkmw0_Oe6iRgEDI-wJ9nc6tQWi9ybbMHi1LDBjxW4rbFlq7G59C1QZGabd14QO7uqAUUSNqHC1l42z_m7BTK1AhFiBEXmMcfW7X0VmGcaEUy7NiNda8rmq_nrdvkxgN8KHguXzxMsw_4GE_d0eQwHcZvS1q-FebI6b8AoqpoltFOZvUACCrfXH_D_UPshHuJM3apXbD2dg_zQicc8oWBHVGiobLQ'
Show live stream (retrieve details for watching) with your dashboard
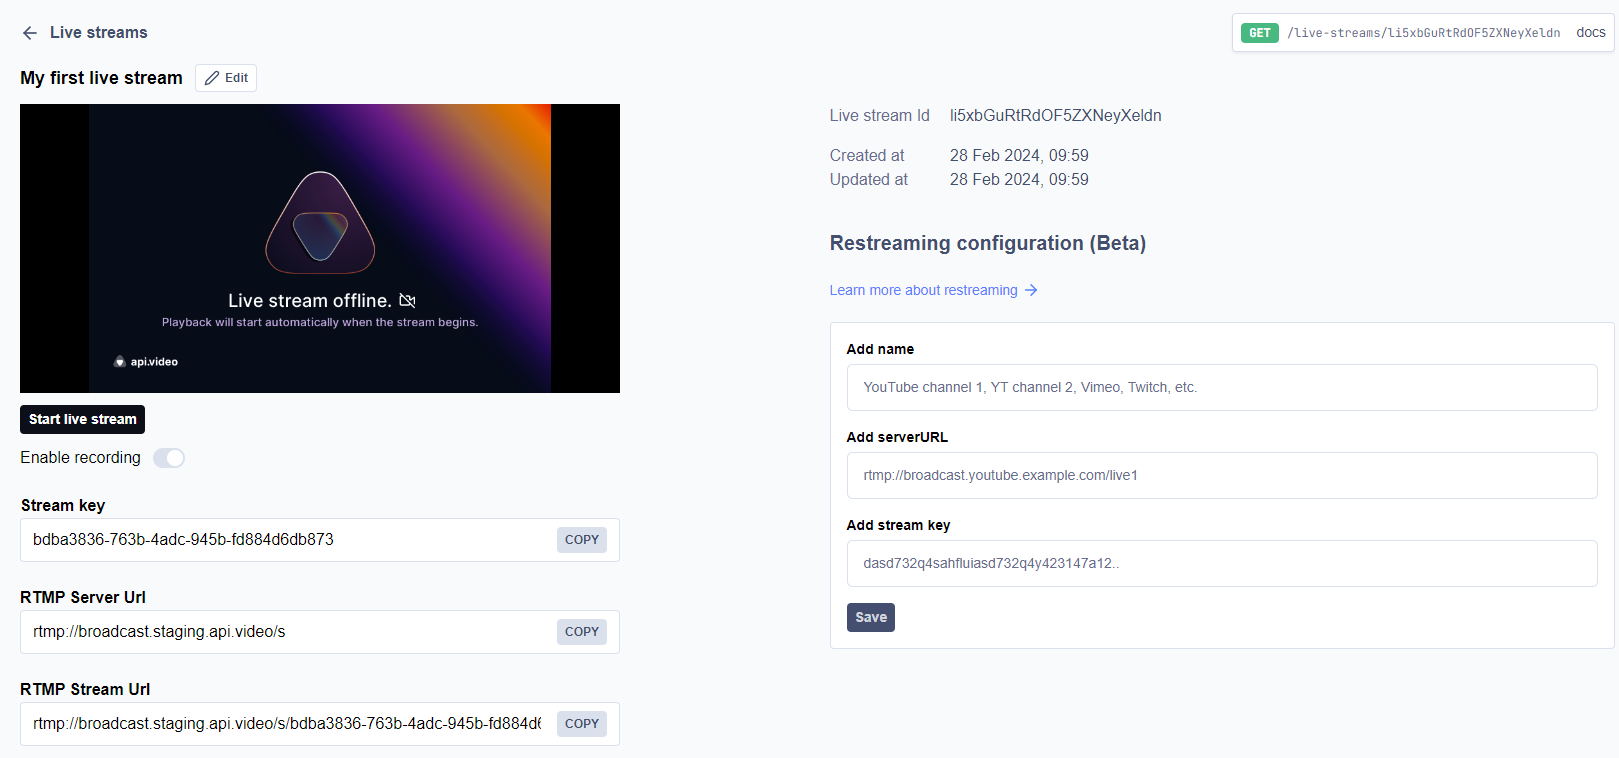
If you don't want to retrieve details about a live stream programmatically, you can retrieve live stream details from your dashboard. Do the following:
Log in to your dashboard.
From the menu on the left, click Live streams. The Live streams page opens.
If you have a lot of live stream containers, you can filter them by title using the search bar at the top of the Live streams page. Otherwise, click on the live stream container you want information about.
When you click on a container title, you'll get a pop-up with some quick details about the live stream container. If you want full details, click Live Stream Details. This will bring up all information about the live stream container you wanted to review.
Update a live stream
If you want to update details for your live stream, you need the unique ID for your live stream and then the changes you want to make. You're able to update:
name- A string representing the name of your live stream.public- A boolean representing whether your video is public or not (true for public, false for private).playerId- You can associate an api.video player with your live stream by providing the player's ID.
The code sample to update is:
curl --request PATCH \
     --url https://ws.api.video/live-streams/li400mYKSgQ6xs7taUeSaEKr \
     --header 'Accept: application/json' \
     --header 'Authorization: Bearer eyJ0eXAiOiJKV1QiLCJhbGciOiJSUzI1NiJ9.eyJpYXQiOjE2NDI4MTQxNDUuMjE2Mzc2LCJuYmYiOjE2NDI4MTQxNDUuMjE2Mzc2LCJleHAiOjE2NDI4MTc3NDUuMjE2Mzc2LCJwcm9qZWN0SWQiOiJwclJ6SUpKQTdCTHNxSGpTNDVLVnBCMSJ9.GSDqqMzBxo-wOwl9IVbOnzevm8A6LSyaR5kxCWUdkEneSU0kIdoNfhwmXZBq5QWpVa-0GIT8JR59W6npNO-ayhaXmV3LA6EQpvv0mHd_dAhg3N8T96eC0ps0YIrkmw0_Oe6iRgEDI-wJ9nc6tQWi9ybbMHi1LDBjxW4rbFlq7G59C1QZGabd14QO7uqAUUSNqHC1l42z_m7BTK1AhFiBEXmMcfW7X0VmGcaEUy7NiNda8rmq_nrdvkxgN8KHguXzxMsw_4GE_d0eQwHcZvS1q-FebI6b8AoqpoltFOZvUACCrfXH_D_UPshHuJM3apXbD2dg_zQicc8oWBHVGiobLQ' \
     --header 'Content-Type: application/json' \
     --data '
{
     "name": "My Live Stream Video",
     "public": true,
     "playerId": "pl45KFKdlddgk654dspkze"
}
'
Update a live stream using the dashboard
You can update live stream details from your dashboard if you don't want to retrieve details about a stream programmatically. Do the following:
Log in to your dashboard.
From the menu on the left, click Live streams. The Live streams screen opens.
Choose the live stream container you want to update by clicking on it. A pop-up appears displaying key details about your live stream.
Click Live Stream Details to open a display of complete information about your live stream.
You can change the title of your live stream, upload a thumbnail, and associate a player ID on this screen. When you're done, click Save.
Complete a live stream
You can request the API to complete a live stream that is currently running. This operation is asynchronous and the live stream will stop after a few seconds.
The API adds the EXT-X-ENDLIST tag to the live stream's HLS manifest. This stops the live stream on the player and also stops the recording of the live stream. The API keeps the incoming connection from the streamer open for at most 1 minute, which can be used to terminate the stream.
curl --request PUT \
     --url https://ws.api.video/live-streams/li400mYKSgQ6xs7taUeSaEKr/complete \
     --header 'Authorization: Bearer eyJ0eXAiOiJKV1QiLCJhbGciOiJSUzI1NiJ9.eyJpYXQiOjE2NDI4MTQxNDUuMjE2Mzc2LCJuYmYiOjE2NDI4MTQxNDUuMjE2Mzc2LCJleHAiOjE2NDI4MTc3NDUuMjE2Mzc2LCJwcm9qZWN0SWQiOiJwclJ6SUpKQTdCTHNxSGpTNDVLVnBCMSJ9.GSDqqMzBxo-wOwl9IVbOnzevm8A6LSyaR5kxCWUdkEneSU0kIdoNfhwmXZBq5QWpVa-0GIT8JR59W6npNO-ayhaXmV3LA6EQpvv0mHd_dAhg3N8T96eC0ps0YIrkmw0_Oe6iRgEDI-wJ9nc6tQWi9ybbMHi1LDBjxW4rbFlq7G59C1QZGabd14QO7uqAUUSNqHC1l42z_m7BTK1AhFiBEXmMcfW7X0VmGcaEUy7NiNda8rmq_nrdvkxgN8KHguXzxMsw_4GE_d0eQwHcZvS1q-FebI6b8AoqpoltFOZvUACCrfXH_D_UPshHuJM3apXbD2dg_zQicc8oWBHVGiobLQ'
api.video recommends that you use this endpoint to properly complete a live stream.
Delete a live stream
You can delete a live stream by sending in a DELETE request using the unique ID for the live stream. The code sample looks like this:
curl --request DELETE \
     --url https://ws.api.video/live-streams/li400mYKSgQ6xs7taUeSaEKr \
     --header 'Authorization: Bearer eyJ0eXAiOiJKV1QiLCJhbGciOiJSUzI1NiJ9.eyJpYXQiOjE2NDI4MTQxNDUuMjE2Mzc2LCJuYmYiOjE2NDI4MTQxNDUuMjE2Mzc2LCJleHAiOjE2NDI4MTc3NDUuMjE2Mzc2LCJwcm9qZWN0SWQiOiJwclJ6SUpKQTdCTHNxSGpTNDVLVnBCMSJ9.GSDqqMzBxo-wOwl9IVbOnzevm8A6LSyaR5kxCWUdkEneSU0kIdoNfhwmXZBq5QWpVa-0GIT8JR59W6npNO-ayhaXmV3LA6EQpvv0mHd_dAhg3N8T96eC0ps0YIrkmw0_Oe6iRgEDI-wJ9nc6tQWi9ybbMHi1LDBjxW4rbFlq7G59C1QZGabd14QO7uqAUUSNqHC1l42z_m7BTK1AhFiBEXmMcfW7X0VmGcaEUy7NiNda8rmq_nrdvkxgN8KHguXzxMsw_4GE_d0eQwHcZvS1q-FebI6b8AoqpoltFOZvUACCrfXH_D_UPshHuJM3apXbD2dg_zQicc8oWBHVGiobLQ'
Delete a live stream from your dashboard
To delete a live stream from your dashboard, do the following:
Log in to your dashboard.
From the menu on the left, click Live streams.
Check the check box next to one or more live stream containers you want to delete. Please choose carefully. Once you delete them, they are not retrievable. After checking one or more boxes, a trash can icon appears at the bottom of the screen.
Click the trash can icon.
You'll see a pop-up asking if you're sure you want to delete because deletion is permanent. If you want to delete the live stream(s) you checked the box for, click Confirm.